
Table of Contents
In today’s fast-paced business environment, efficient management of tasks, clients, and projects is essential for success. With Xora, client management is a breeze. From lead management to invoicing, all in one place. Whether you’re a solo entrepreneur or managing a team, Xora’s user-friendly interface allows you to get started quickly and efficiently. In this guide, we’ll walk you through how to get up and running with Xora in less than 30 minutes.
1. Sign Up and Initial Setup of Xora Client Management (5 Minutes)
Getting started with Xora client management is a straightforward process that can be completed in just five minutes. Here’s how to do it:
Step 1: Sign Up for an Account
Begin by visiting www.getxora.com and clicking on the prominently displayed on the homepage. This trial is a great way to explore the features of Xora without any upfront commitment.Xora Client Management offers an easy and efficient way to handle client relationships. In this quick-start guide, we’ll walk you through setting up Xora’s powerful client management tools in less than 20 minutes, so you can start streamlining your processes today
- Enter Your Email Address: You’ll be prompted to provide your email address. Ensure you use a valid email that you regularly check, as this will be your primary point of communication for account-related updates.
- Create a Password: Choose a strong password that combines letters, numbers, and special characters to enhance your account’s security.
- Basic Business Information: Fill out the basic information about your business, including your business name, type, and contact details. This information is crucial for personalizing your experience within Xora.
Trial Benefits
One of the standout features of Xora is its generous trial offering. Unlike many other platforms, Xora does not limit the trial period. They understand that your project lifecycle can vary greatly, spanning from just a few days to several months. Therefore, during the trial, you can add up to three active projects, allowing you to test the platform’s functionalities fully. This trial will remain active indefinitely until you complete it, giving you ample time to explore all that Xora has to offer.
Step 2: Initial Setup Process
Once you’ve successfully signed up, Xora will guide you through the initial setup process. This setup is designed to help you tailor the platform to your specific needs:
- Choosing Your Plan: After signing up, you’ll be prompted to select a subscription plan that best suits your business requirements. Xora offers several tiers, including:
- Solo Plan: Ideal for individual photographers or small businesses starting.
- Starter Plan: Perfect for small teams looking to manage multiple projects.
- Pro Plan: Designed for larger organizations with advanced needs, offering additional features and support.
- Setting Up Your Profile: Once you select your plan, you’ll need to set up your profile. This step is crucial as it personalizes your Xora experience. You can:
- Add Your Business Name: This will appear on all invoices and communications, ensuring clients recognize your brand.
- Upload Your Logo: Incorporating your logo adds a professional touch to client-facing documents, reinforcing your brand identity.
- Provide Contact Information: Ensure your contact details are up to date. This information will be used in communications and on contracts and invoices.
- Inviting Team Members: If you’re working with a team, Xora allows you to invite your colleagues to join your account. This collaborative feature is invaluable for managing projects efficiently. You can assign various roles, including:
- Associate: Limited access to specific projects, ideal for junior team members.
- Manager: Can oversee projects and has more access than associates.
- Accountant: Focused access for financial tasks, such as invoicing and expense management.
- Admin: Full access to all features and settings, perfect for team leaders or owners.
Step 3: Configuring Your Dashboard
After completing the initial setup, you’ll be directed to your dashboard. This is your command centre within Xora, where you can manage your projects, track tasks, and monitor client interactions. Here’s how to configure it effectively:
- Customize Your Dashboard Layout: Xora allows you to customize your dashboard to highlight the most relevant information for your workflow. You can choose which widgets to display, such as upcoming tasks, active projects, and recent client communications.
- Set Up Notifications: Ensure that notifications are enabled for important updates, such as project deadlines or client messages. You can choose to receive notifications via email or within the platform, helping you stay on top of your responsibilities.
- Integrate Other Tools: If you use other software tools for your business, explore Xora’s integration options. Connecting applications like Google Calendar, accounting software, or email platforms can streamline your workflow further and enhance productivity.
Step 4: Training and Support
Once you have set up your profile and dashboard, take advantage of Xora’s resources to get familiar with the platform:
- Explore Tutorials and Guides: Xora offers a library of tutorials and guides designed to help you navigate the software and make the most of its features. Spend some time reviewing these resources to get acquainted with the platform.
- Utilize Customer Support: If you encounter any challenges during setup or while using the software, don’t hesitate to reach out to Xora’s customer support. They are available to assist you with any queries or issues you may have.
- Join the Community: Many software platforms have user communities where you can connect with other users, share tips, and ask questions. Engaging with the community can provide valuable insights and help you maximize your use of Xora.
2. Customizing Your Workspace – Xora client management (5 minutes)
Xora’s flexibility allows you to customize your workspace to fit your unique workflow. Here’s how to tailor it to your needs:
- Dashboard Overview: The dashboard is your central hub in Xora client management, giving you a snapshot of your business’s performance. The dashboard is a quick and easy way to look at your entire project pipeline at a glance. It also allows you to look at the tasks that you need to complete as well as any notes that you have recently documented. It is a place to catch up on the recent activity performed by your team members.
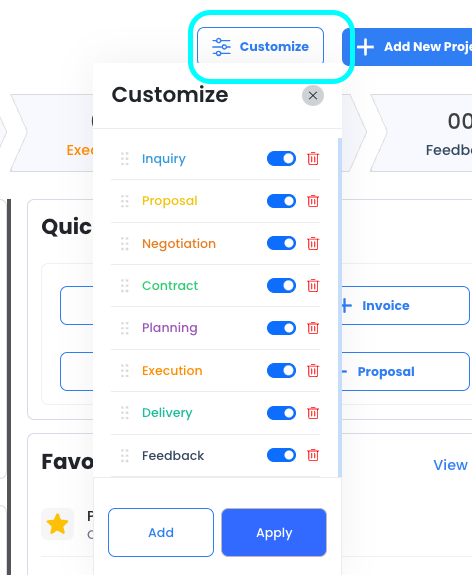
- Customizing your pipeline: Xora’s pipeline can be customized based on your specific business. Click on the customize button to add/remove any pipeline stages that are not relevant for your business. You can also re-order the stages if you do certain stages before other stages.
3. Adding Clients and Projects (10 minutes)
Once your workspace is set up, it’s time to add clients and projects to Xora. This process is straightforward:
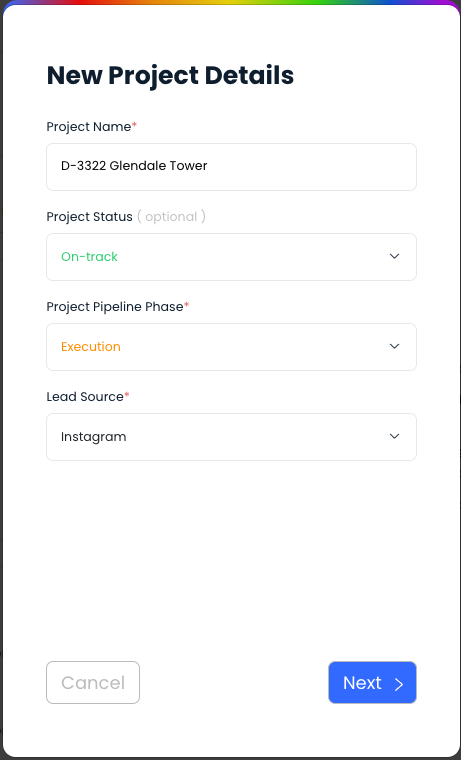
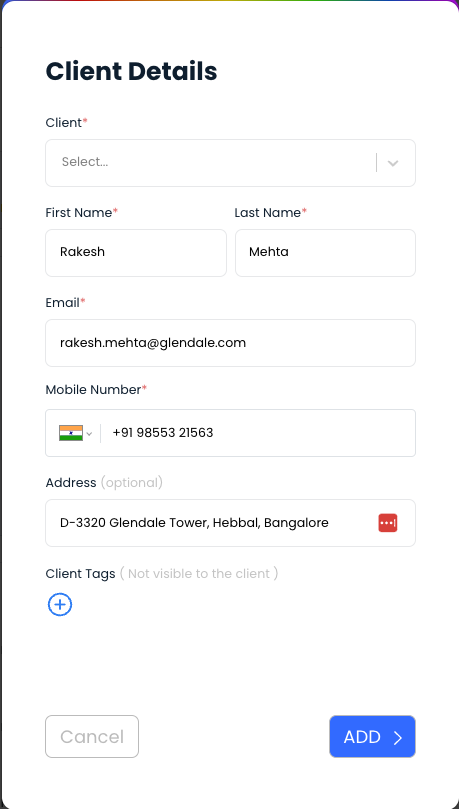
- Creating Projects in Xora client management: If you are on dashboard, click on the “+Add New Project” button and fill the relevant project detail. Click on next and then select whether this project is for an existing client or enter information for the new client.
- After adding a project, you can update other details such as lead source, project due date etc. on the overview page. You can add any team members to the project.
- Using Templates: Xora offers a variety of templates to help you get started quickly. Whether it’s a project plan, contract, or invoice, you can customize these templates to match your business’s branding and workflow. You can also use your own templates.
- Adding Clients: The best part about Xora client management is that you don’t have to separately keep adding clients to your contacts. All the clients added to any project will get saved automatically in the clients section so that you can use this list to send any marketing materials to in the future.
4. Invoicing and Expense Management in Xora client management (5 minutes)
Invoicing and expense management are critical components of any business, and Xora simplifies these processes:
- Creating Invoices: Generate professional-looking invoices with just a few clicks. Go to the project for which you want to create an invoice and go to the Invoices module. Click “Create New Invoice” and add the necessary details. Xora will automatically pull in the project details, client details etc. to create an accurate invoice. You can also customize the invoice with your branding and add any necessary terms or conditions.
- Managing Expenses: Track all project-related expenses in the Expenses module. You can categorize expenses, attach receipts, and assign them to specific projects. This ensures that you have a clear view of your project’s financials at all times.
- Payment Processing: Xora integrates with Cashfree allowing clients to pay invoices online. Within Xora, you can set up payment schedules, send reminders, and track payments directly. All payments made by clients via the payment links generated with the invoice will be tracked and invoice status will be automatically updated as paid.
5. Utilizing the Dealroom (5 minutes)
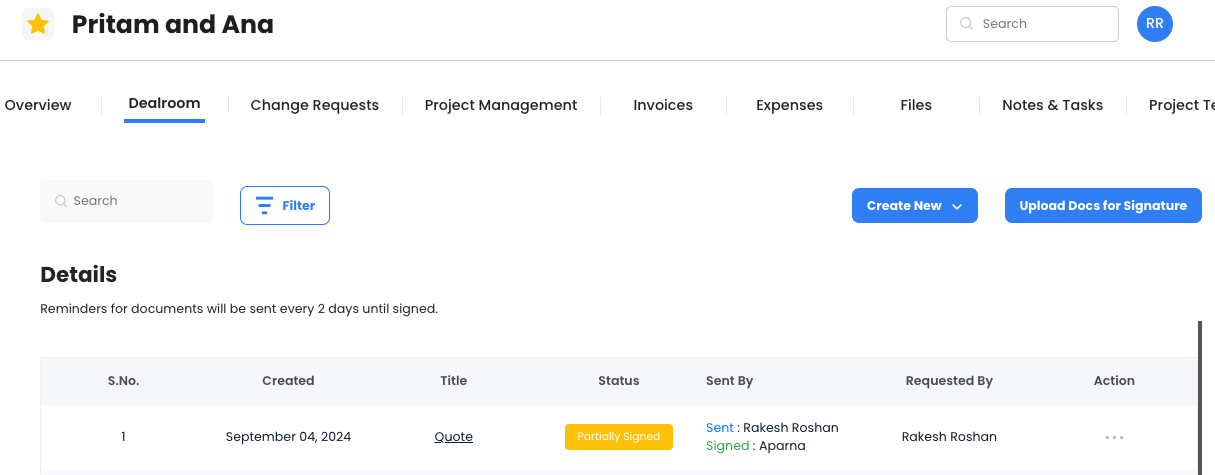
The Dealroom in Xora is a centralized location where you can manage all documents and communications related to a specific deal:
- Uploading Documents: You can upload contracts, proposals, and other documents directly to the Dealroom. Xora client management supports Word templates, which you can edit and reuse across multiple projects. Alternatively, you can upload documents directly for signature.
- E-signatures: Collect signatures on contracts and agreements without leaving Xora. The Dealroom makes it easy for clients to review and sign documents, streamlining the approval process. Your clients receive a Whatsapp notification as well as email to complete the signing. Your clients just click on the link to open your document and click on Sign Document button to draw their signature. That’s it!
- Collaboration: The Dealroom also supports collaboration, allowing you to invite clients and team members to review documents.
6. Exploring Reports and Analytics (Optional)
Getting Started with Xora: Core Features and Reporting
While getting started with the core features of Xora can be accomplished in just 30 minutes, taking the time to explore the platform’s robust reporting and analytics capabilities is equally important. Understanding these features can significantly enhance your ability to make informed decisions and improve your business operations.
Standard Reports
Xora offers a variety of standard reports designed to give you valuable insights into your business’s performance. These reports include:
- Financial Summaries: Gain a clear overview of your financial health with detailed summaries that outline income, expenses, and profit margins. This report helps you track financial performance over specific periods, allowing for better budgeting and forecasting.
- Project Status Reports: Monitor the progress of ongoing projects with real-time status updates. These reports detail milestones achieved, tasks completed, and any pending activities, helping you keep projects on track and identify potential bottlenecks early.
- Client Activity Reports: Understand your interactions with clients through comprehensive activity reports. These reports highlight communication history, project involvement, and engagement levels, enabling you to nurture client relationships and tailor your services to their needs.
You can easily access these reports from the “Action Center” located on the left-hand side panel of the Xora interface. The intuitive design makes it simple to navigate between different reporting options, ensuring you can find the information you need quickly.
Exporting Data
For those who require deeper analysis or wish to share insights with stakeholders, Xora provides seamless options for exporting data. The ability to export reports to Excel or PDF formats is particularly beneficial:
- Excel Exports: Exporting to Excel allows for advanced data manipulation and analysis. You can create custom formulas, perform calculations, and visualize data using charts and graphs. This feature is especially useful for users who need to delve into specific aspects of their data or conduct comparative analyses.
- PDF Exports: If you need to present information in a professional format, exporting reports to PDF is ideal. PDFs maintain the integrity of the data and layout, making it easy to share with clients, team members, or stakeholders who may not have access to Xora. This is particularly advantageous for formal presentations or when submitting reports to upper management.
By utilizing the exporting feature, you can keep a detailed record of your business activities and performance metrics, ensuring that you have the necessary documentation for strategic planning and discussions.
Additional Benefits of Xora’s Reporting and Analytics Features
In addition to standard reports and exporting capabilities, Xora’s reporting and analytics tools offer several other benefits that can significantly enhance your business operations and decision-making process. Here’s a closer look at these advantages:
1. Customizable Reports
Xora empowers users with the ability to create customizable reports tailored to their specific business needs. This flexibility is crucial for photographers and businesses that require precise metrics to evaluate their performance.
- Focus on Key Metrics: You can choose which metrics to display, whether it’s sales trends, project completion rates, or client engagement levels. This allows for in-depth analysis based on what matters most to your business.
- Template Creation: Xora allows you to save report templates, so you can easily generate similar reports in the future without starting from scratch. This feature saves time and ensures consistency in reporting.
- Industry-Specific Metrics: Depending on your field, you can include industry-specific metrics that are critical for understanding your unique business dynamics, making the reports more relevant.
2. Real-Time Data Updates
One of the standout features of Xora is its capability for real-time data updates. This functionality ensures that you always have the most current information available at your fingertips.
- Timely Decision-Making: Access to real-time data is crucial for making timely decisions in a fast-paced business environment. Whether you’re assessing the performance of a current project or evaluating client feedback, having up-to-date information helps you respond quickly to changes.
- Instant Alerts: Xora can send notifications about critical updates, such as changes in project status or client interactions. These alerts keep you informed and enable proactive management.
3. Data Visualization
Xora incorporates advanced data visualization tools within its reporting framework, helping users quickly grasp trends and patterns.
- Graphs and Charts: Users can view data represented through graphs and charts, making complex information easier to understand at a glance. This visual representation can highlight trends that might not be immediately obvious in raw data.
- Interactive Dashboards: Xora often features customizable dashboards that display key performance indicators (KPIs) visually. This interactive interface allows users to click through different metrics and gain insights quickly.
- Enhanced Understanding: Data visualization aids in enhancing understanding and retention of information. When users can visualize trends, they are more likely to remember and act upon the data presented.
4. Automated Reporting
Xora’s automated reporting feature is designed to streamline your workflow and ensure you stay informed about your business’s performance.
- Scheduled Reports: You can set up automated reporting schedules to receive regular updates at specified intervals (daily, weekly, or monthly). This ensures that you have the latest data without needing to manually generate reports each time.
- Email Notifications: Automated reports can be sent directly to your email or the email of your team members, keeping everyone updated on key metrics and performance without additional effort.
- Consistent Monitoring: This feature allows for consistent monitoring of performance metrics over time, enabling users to spot trends and make adjustments as necessary without delay.
5. User-Friendly Interface
Xora boasts a user-friendly interface that caters to users of all levels, ensuring that everyone can navigate the reporting tools with ease.
- Intuitive Design: The platform’s intuitive design simplifies the process of generating and accessing reports. Users can quickly learn how to use the features, reducing the learning curve for new team members.
- Help Resources: Xora provides tutorials, help guides, and customer support to assist users in understanding the reporting tools and maximizing their use.
- Customization Options: Even for users who are not tech-savvy, the customizable options allow for straightforward modifications to reports, making the process accessible and efficient.
6. Integration with Other Tools
Xora’s reporting features can often integrate with other software tools that you may be using, further enhancing its capabilities.
- Comprehensive Data Analysis: By integrating with accounting software, marketing tools, and project management applications, you can aggregate data from various sources into Xora for a more comprehensive analysis.
- Seamless Workflow: Integration ensures that your workflow remains seamless, allowing for the automatic transfer of data between platforms and minimizing the need for manual entry.
- Enhanced Collaboration: When reports and data can be shared across different tools, it fosters better collaboration among team members, improving overall efficiency.
7. Mobile Access
In today’s fast-paced world, having mobile access to reporting and analytics features is crucial for professionals on the go.
- Access Anywhere: Xora’s mobile capabilities allow users to access their reports and dashboards from their smartphones or tablets, enabling decision-making on the move.
- Real-Time Updates on the Go: Whether you’re at a shoot or meeting with a client, you can quickly check important metrics or share reports, ensuring you are always informed.
- Convenient Notifications: Mobile notifications keep you updated about project statuses or client inquiries, allowing for timely responses even when you are away from your desk.

Conclusion
Getting started with Xora is designed to be quick and efficient, allowing you to set up your business’s workflow management in less than 30 minutes. By following the steps outlined in this guide, you’ll be well on your way to managing clients, projects, and finances more effectively. As you continue to use Xora, you’ll discover even more features and tools that can help you streamline your operations and grow your business.
Remember, the goal of Xora is to simplify and enhance your business processes, giving you more time to focus on what you do best—delivering exceptional service to your clients. Whether you’re just starting out or looking to optimize an established business, Xora provides the flexibility and power you need to succeed.
Leave a Reply