
Table of Contents
Introduction
When it comes to client onboarding and closing deals, a clear and professional proposal can make all the difference. That’s why Xora offers a powerful business proposal software built right into your workflow.
In this blog, we’ll walk you through how to create a client proposal with Xora, step-by-step, and highlight the latest updates to make your process faster, smoother, and more personalized.
Whether you’re an interior designer, photographer, freelancer, or agency owner, proposals are your first impression, your pitch, and often your deal-closer.
But building a client proposal from scratch every time? That’s where things get slow, messy, and inconsistent.
This is why so many service businesses are now asking:
👉 How do I create a client proposal with Xora?
You’re in the right place. In this detailed guide, we’ll walk you through:
- How to create a client proposal with Xora (step-by-step)
- Why it’s faster and more effective than traditional tools
- What new features has Xora recently added
- Pro tips for improving your proposal acceptance rate
Let’s dive in.
Why Proposals Matter More Than Ever
A proposal is more than a document—it’s a presentation of value.
It tells your client:
What you’re offering
How do you solve their problem
What they’ll pay
What’s expected of both parties
The better your proposal, the better your chances of converting a lead into a client.
That’s why Xora developed a modern proposal builder designed to help you create high-converting client proposals quickly and professionally.
How to Create a Client Proposal with Xora
Let’s walk through the full proposal creation process using Xora’s intuitive interface.
Step 1: Open the Proposals Dashboard
Start by logging into your Xora account and clicking on the “Proposals” tab from the left navigation menu. This is your centralized hub for managing past and ongoing proposals.
Here, you’ll see:
- Sent proposals
- Drafts
- Client status (pending, accepted, or declined)
Step 2: Click Create New Proposal
To begin a new proposal, click the Create New Proposal button. This will open a fresh form tailored for easy input and customization.
This is the core step in learning how to create a client proposal with Xora.
Step 3: Fill in Your Company Details
Add your business information:
- Business name
- Contact number
- Email address
This appears at the top of the proposal and ensures brand identity is front and centre.
💡 Pro Tip: Save your company info under settings so it’s auto-filled for every proposal!

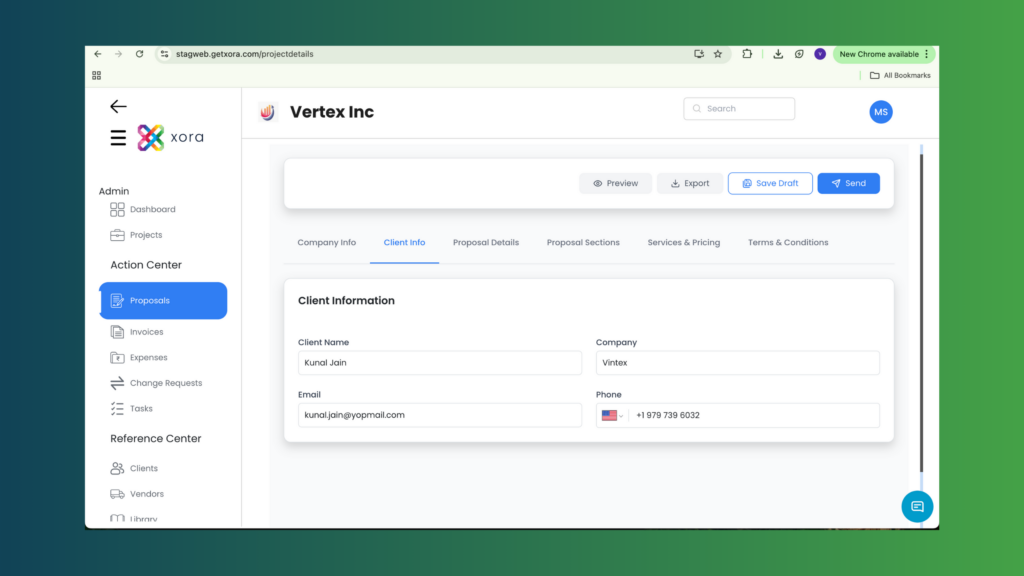
Step 4: Add Client Information
Next, enter your client’s details:
- Full name
- Phone number
- Email address
This ensures your proposal reaches the right person and looks personalized.
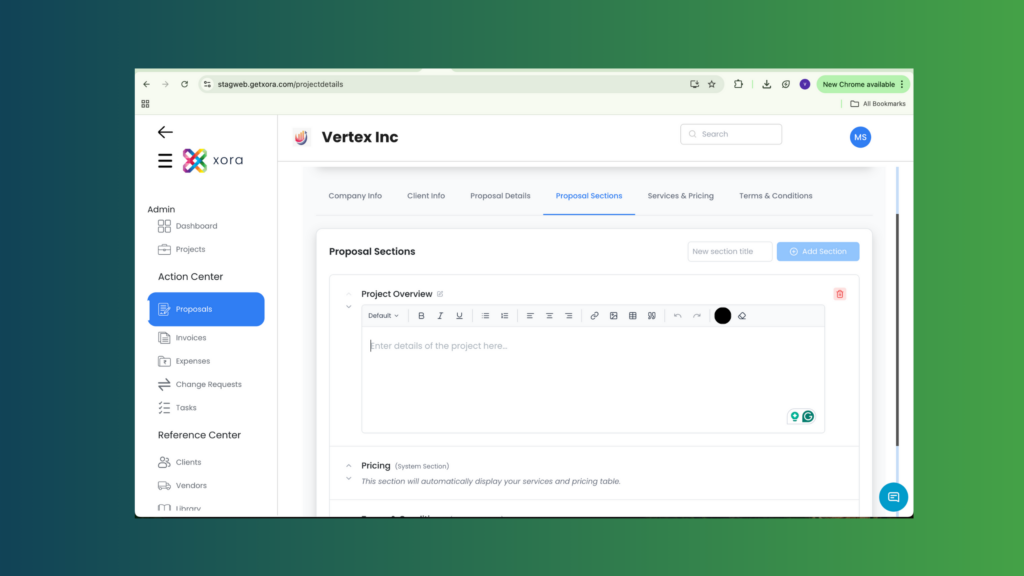
Step 5: Enter Project & Proposal Details
Now, describe what the client is hiring you for:
- Project Title
- Overview – What is the objective? What problem are you solving?
- Design Notes / Scope of Work – What deliverables will you provide?
Use clear, benefit-driven language. Show the client you understand their goals and that you have a plan to deliver results.
Step 6: Add Services & Pricing Breakdown
Create a list of the services you’ll provide. For each service, include:
- Name
- Description (optional)
- Price
- Tax (if applicable)
Example:
| Service | Price | Tax |
|---|---|---|
| Interior Consultation | ₹2,000 | 18% GST |
| 3D Layout Design | ₹10,000 | 18% GST |
This transparent format helps build trust.
Step 7: Include Terms & Conditions
No professional proposal is complete without clear terms. You can add:
- Payment schedule (e.g., 50% upfront)
- Cancellation policy
- Timeline for delivery
- Revision rules
Xora lets you reuse saved legal clauses to save time and maintain consistency.
Step 8: Click “Send Proposal”
Once everything looks good, click “Send”. The proposal will be emailed to the client in a beautiful, mobile-friendly format.
You’ll be notified once the client opens or interacts with the proposal.
New Features That Make Proposal Creation Smoother
Xora is constantly upgrading the proposal feature to save you time and boost your conversion rate. Here’s what’s new:
🔁 Reusable Templates
Create proposal templates for common services. Reuse them in seconds without starting from scratch.
Smart Auto-Fill
Xora auto-fills your company and client info from previous entries to reduce repetitive typing.
Drag-and-Drop Clause Builder
Mix and match saved blocks for pricing, services, and legal sections.
Proposal Tracking (Coming Soon)
Know when a proposal is opened, viewed, or accepted.
Is It Safe?
Absolutely. All proposals created through Xora are:
- Encrypted
- Cloud-stored
- Accessible only to you and your client
Xora uses enterprise-grade security to protect your business.
Who Should Use Xora’s Proposal Feature?
Xora’s proposal builder is perfect for:
- Interior Designers
- Photographers & Studios
- Freelancers & Consultants
- Agencies & Service Providers
- Event Planners
- Architects & Builders
If you send client quotes or project plans—this feature is made for you.
Tips to Boost Your Proposal Acceptance Rate
If you’re learning how to create a client proposal with Xora, also keep in mind these tips to make it stand out:
Personalize every proposal
Keep pricing transparent
Add testimonials or work samples
Include a strong call to action
Follow up (manually or soon, automatically)
Final Thoughts: Mastering How to Create a Client Proposal with Xora
Creating and sending proposals doesn’t have to be a time-consuming process.
With Xora, you get a fast, professional, and scalable way to present your services and close deals.
So, whether you’re a solo creative or a growing team, learning how to create a client proposal with Xora is the first step toward a more automated and professional workflow.
Leave a Reply